Bulk Index Checker Documentation
Browse each topic from the left sidebar to learn how to register, create projects, manage notifications, review usage analytics, and access the API documentation for Bulk Index Checker.
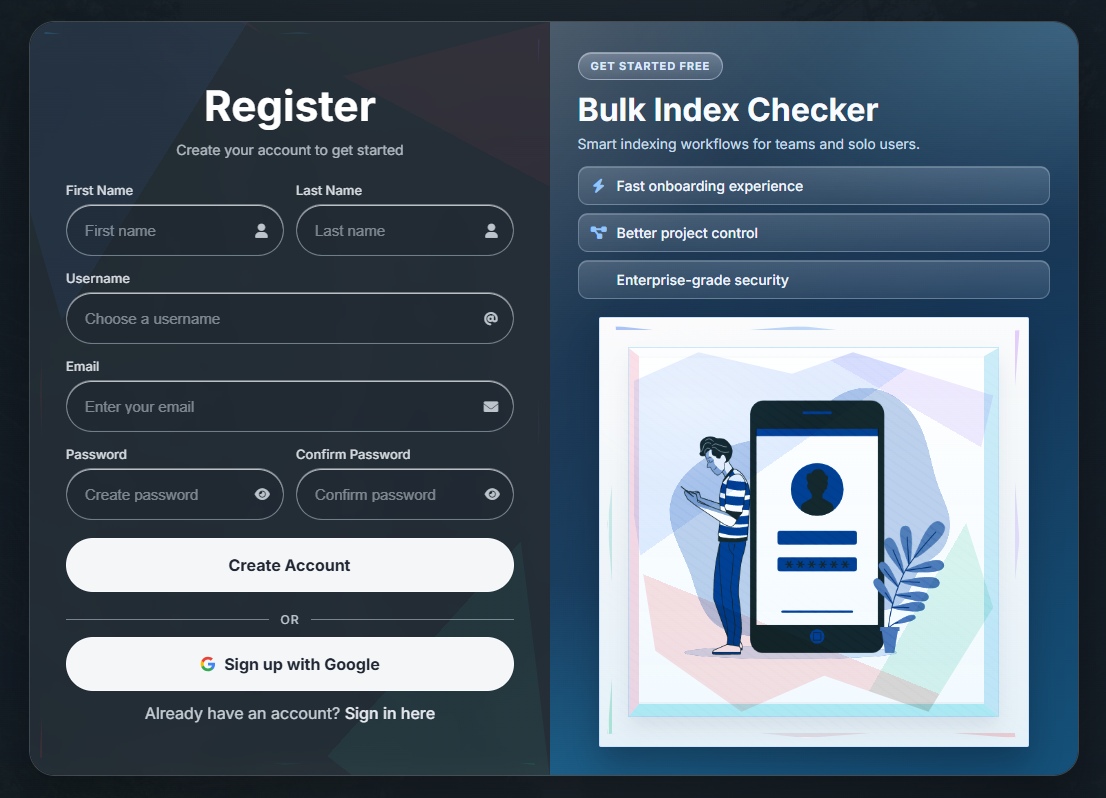
Sign Up Process
Follow these steps to register and activate your Bulk Index Checker account.
To create an account on Bulk Index Checker, follow these simple steps:
Choose Your Preferred Sign-Up Method
We offer two convenient ways to register:
Standard Registration
Enter your name, email address, username, and password to create an account manually.
Google Sign-Up
Quickly sign up using your Google account - no need to remember another password.
Enter Your Details
-
First & Last Name - Used for your account profile.
-
Email Address - This will be your login ID.
-
Username - Used a unique user name.
-
Password - Must be at least 8 characters, with 1 uppercase, 1 lowercase, and 1 number.
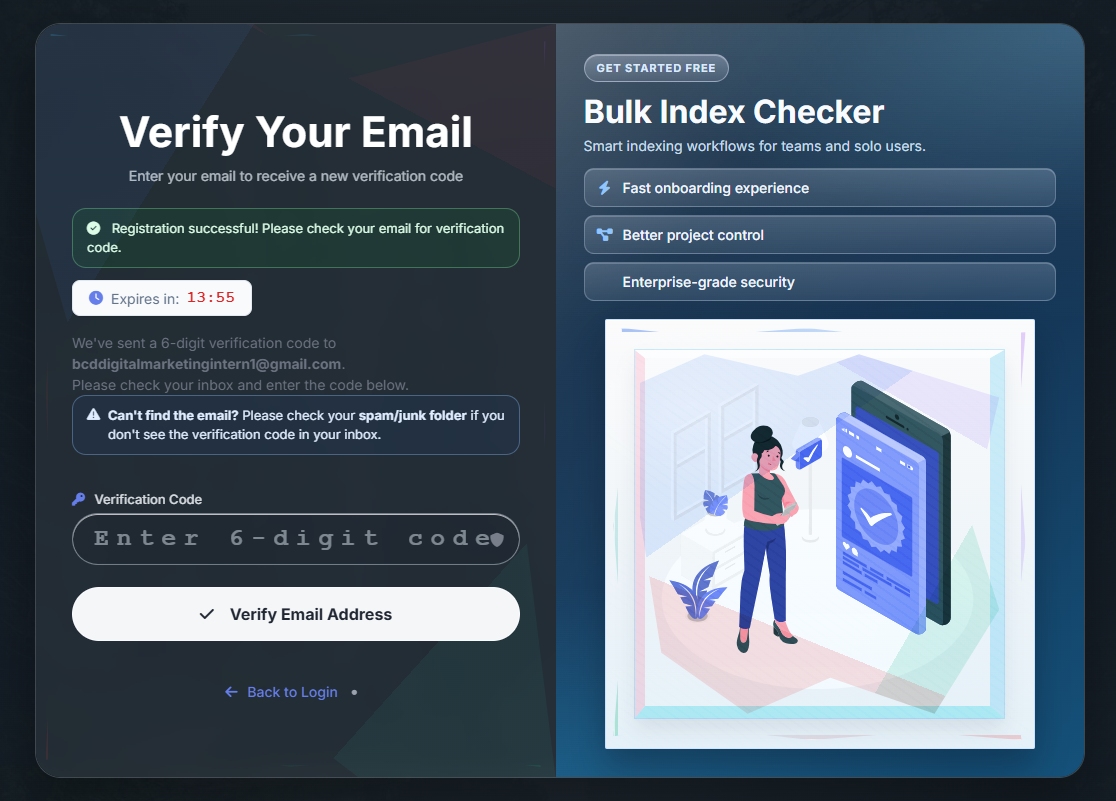
Verify Your Email
-
1
After signing up, an automatic verification email will be sent to the address you provided.
-
2
Check your inbox - look for an email from Bulk Index Checker.
-
3
Open the email and copy the verification code included in the message.
-
4
Return to the Bulk Index Checker website and paste the code into the verification field to activate your account.
-
5
Once verified, your account will be fully activated and ready to use.
Track Your Web Pages for Indexing
Add URLs, configure project settings, and manage indexing schedules for every project.
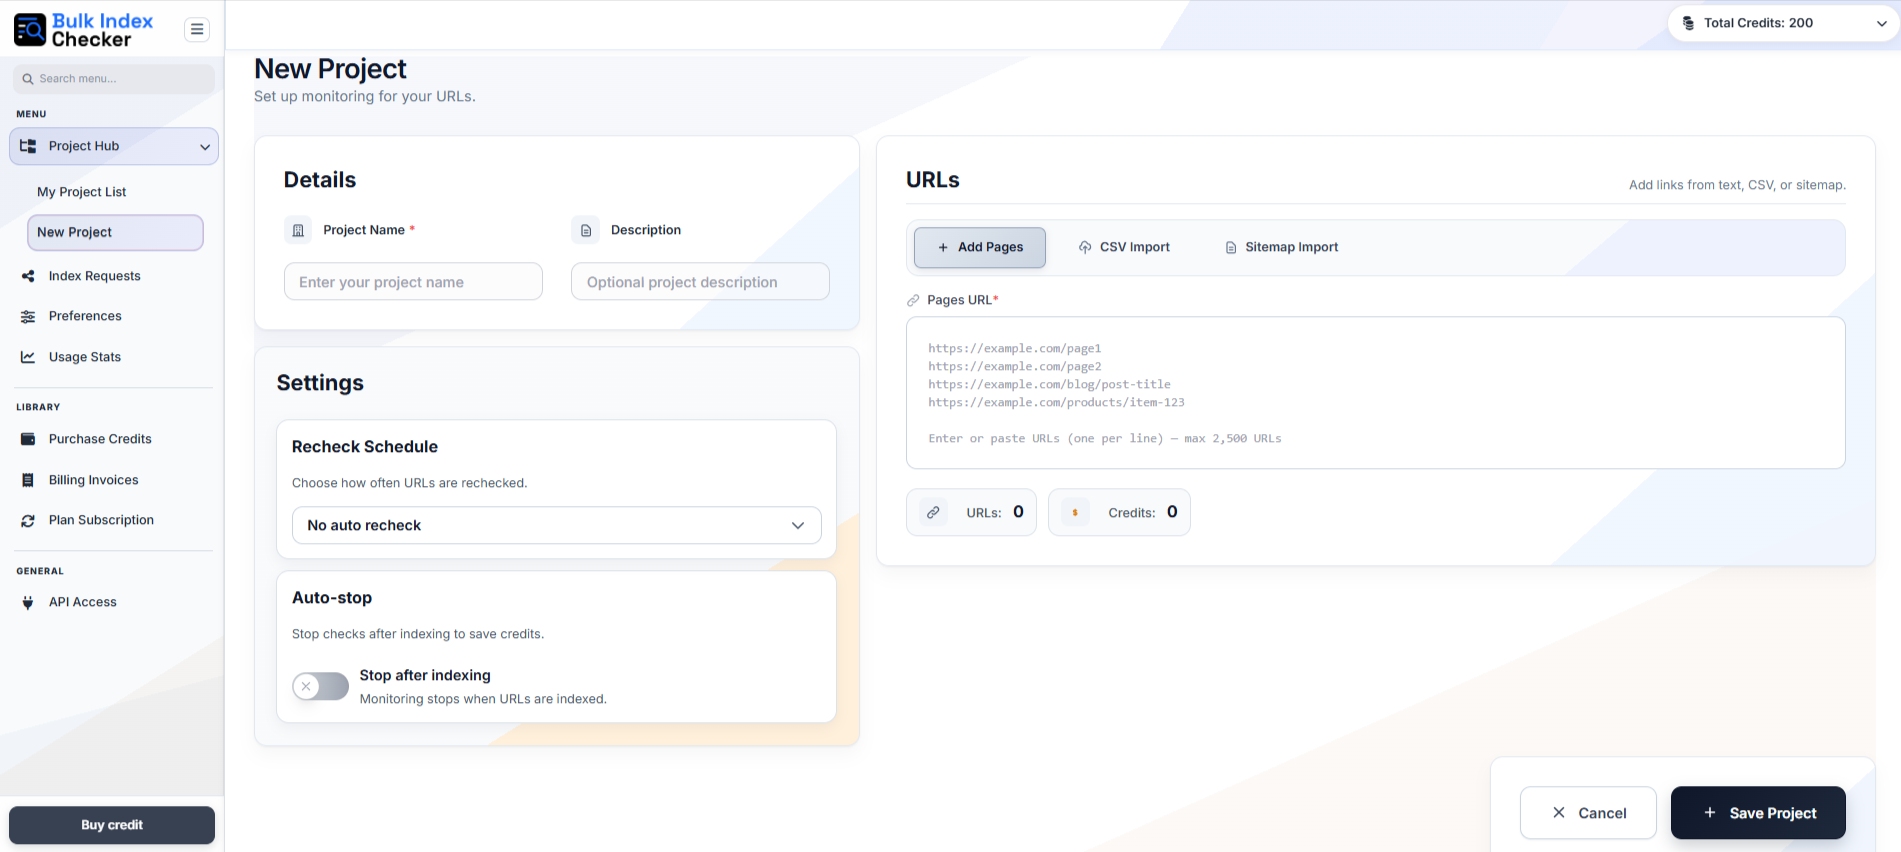
2. Track Your Web Pages for Indexing
This section lets you specify which web pages you want Bulk Index Checker to track for Google indexing. You can add URLs manually or import them in bulk, depending on your workflow and project size.
Key Features and Options
-
Manual URL Entry: Paste your page URLs directly into the text box - one per line.https://example.com/page1 https://example.com/blog/post-title
-
CSV Import: Upload a CSV file containing all the URLs you want to monitor. This option is best for managing large datasets or when working with exported URL lists. Max size is 25MB.
-
Sitemap Import: Automatically import all URLs from your website's sitemap file (e.g., https://example.com/sitemap.xml) for fast project setup. Max 2,500 URLs will be imported from the sitemap.
-
URL Limit: Each project supports up to 2,500 URLs. You can create multiple projects if you need to monitor more pages.
-
Credit Usage: Each added URL consumes Index Checker credits depending on the number of pages monitored and rechecked.
-
Progress Tracking: Once URLs are added, Index Checker continuously monitors their indexing status based on your selected schedule.
-
Data Accuracy: Real-time indexing checks ensure you always have the latest status of your pages, helping you detect deindexed or unindexed URLs quickly.
Project Settings
The Project Settings section allows you to control how and when Bulk Index Checker monitors your URLs after they are added. These settings help automate your rechecking schedule and optimize credit usage.
Recheck Period Schedule
This option lets you define how often your URLs are automatically rechecked for indexing status.
Choose the schedule that best fits your monitoring needs:
-
No Automatic Rechecking: Bulk Index Checker will check URLs only once-ideal for one-time audits.
-
Daily: URLs are automatically rechecked every day to ensure near real-time tracking.
-
Weekly: URLs are rechecked every 7 days, offering a balanced approach between frequency and credit usage.
-
Monthly: URLs are rechecked once a month-perfect for long-term indexing monitoring.
-
Custom Interval: Set your own custom recheck frequency (e.g., every 3 days, every 10 days, etc.) for maximum flexibility.
Auto-stop Option
This setting helps you save credits by automatically stopping checks for URLs that are already indexed.
-
Stop Checking Indexed Pages: When enabled, Bulk Index Checker will automatically stop monitoring any URLs that have been successfully indexed.
Best Practices
- Always include full URLs (with https://) to ensure accurate results.
- Group related URLs under one project for better organization.
- Use sitemap import for large websites and CSV import for structured bulk data.
- Regularly update your project URLs to keep your monitoring data relevant.
- Use Weekly or Custom Interval rechecking for large projects.
- Enable Auto-stop Option to save credits and speed up your workflow.
- Review settings periodically to match your project's indexing goals.
Email Notifications
Control how often you receive indexing updates and what events trigger those alerts.
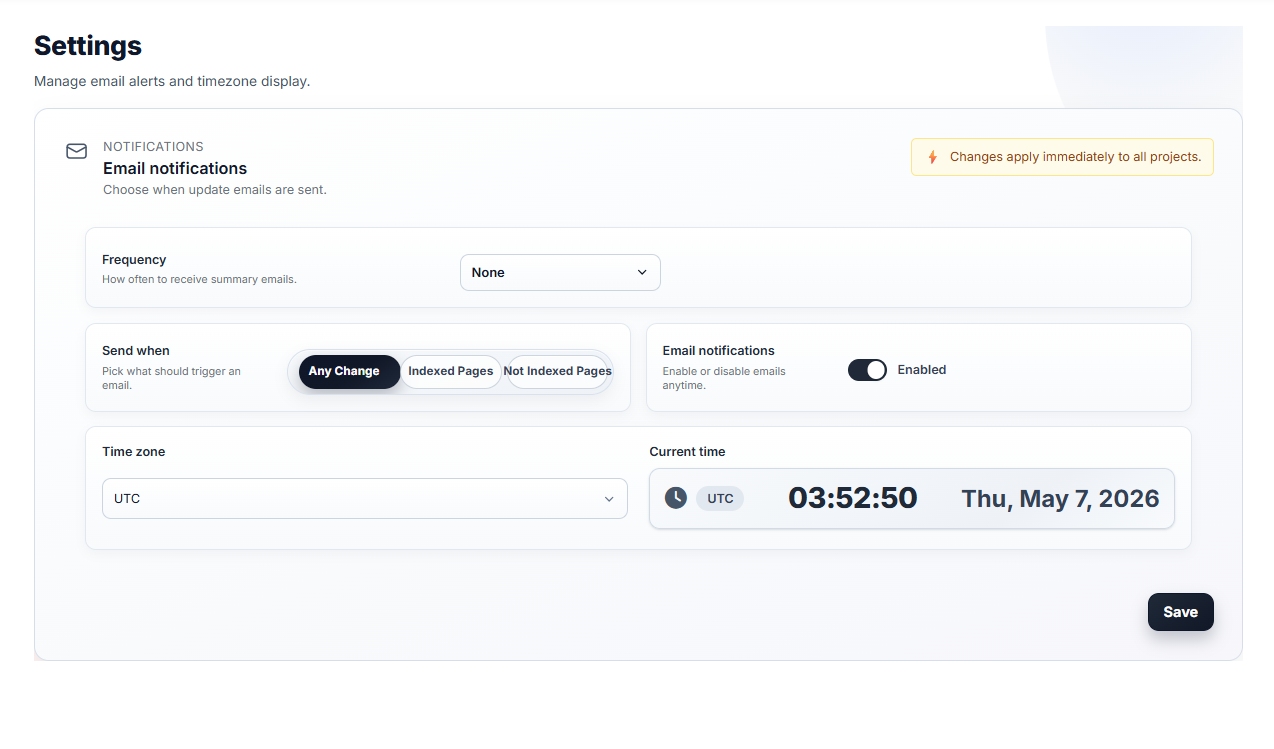
Email Notifications
Stay informed about your URL indexing activity with automated email updates. This section allows you to control how often you receive notifications, when they're triggered, and which time zone applies to your alerts. All settings apply globally across your Bulk Index Checker projects.
Key Features and Settings
Frequency
Choose how often you want to receive summary emails about your URL indexing updates:
- None: Turn off all email notifications.
- Daily: Receive a summary once every 24 hours.
- Weekly: Get updates every 7 days.
- Biweekly: Receive reports every two weeks.
- Monthly: Get a monthly overview of indexing activity.
Send When
Decide which specific changes should trigger an email notification.
- Any Change: Sends an email whenever a page's indexing status changes - for example, if a page moves from indexed to not indexed or vice versa.
- Indexed Pages: Sends an email when Google successfully indexes new pages. Ideal for tracking progress after submitting new URLs.
- Not Indexed Pages: Sends an alert if any page is not indexed, helping you take action quickly to fix potential issues.
-
Email Notifications Toggle: Turn the entire email notification system on or off at any time.
-
Time Zone Setting: Select your preferred time zone so that email schedules and timestamps match your local time.
A real-time preview shows your current time for easy verification.
Best Practices
- Use Daily or Weekly frequency for active projects.
- Choose Any Change to catch both new indexings and sudden deindexing events.
- Make sure your time zone is accurate to receive timely alerts.
- Click Save Changes to apply updates - changes take effect immediately across all projects.
Usage Overview
Understand how credits are consumed across projects, schedules, and monitoring activity.
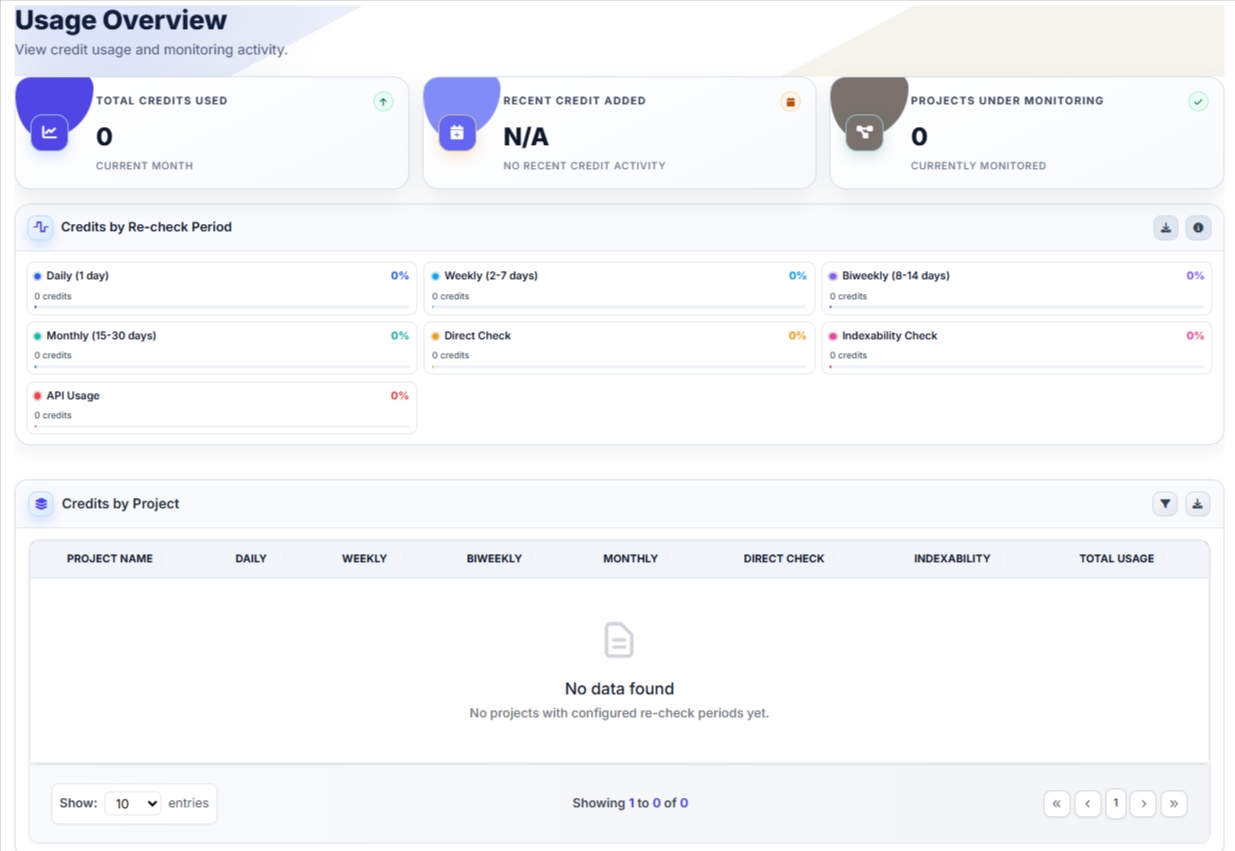
Usage Analytics
The Usage Analytics section provides a complete overview of your credit consumption, project activity, and monitoring performance. It helps you understand how your Bulk Index Checker credits are used across different projects and recheck schedules, ensuring efficient credit management and accurate reporting.
Key Features and Insights
-
Total Credit Usage: Displays the total number of credits used during the current month, helping you track your overall monitoring cost and activity level.
-
Credits Added: Shows the date and time when new credits were added to your account, giving you a quick reference for your latest top-up.
-
Active Projects: Indicates the total number of active monitoring projects currently running in your account.
Usage Breakdown by Period
View how your credits are distributed based on different recheck intervals and monitoring types:
- Daily (1 day): Credits used for daily URL rechecks.
- Weekly (2-7 days): Credits consumed by weekly monitoring cycles.
- Biweekly (8-14 days): Tracks usage from two-week intervals.
- Monthly (15-30 days): Credits used in monthly recheck schedules.
- Direct Check: On-demand indexing checks run manually by the user.
- API Usage: Credits used through external API integrations.
Usage Breakdown by Project
-
This table shows credit usage per project, categorized by recheck frequency. It allows you to compare activity across different projects to see which ones are using the most resources.
-
Each project lists its credit usage by Daily, Weekly, Biweekly, Monthly, and Direct Check categories.
-
Export your analytics using the download button for reporting or team sharing.
Best Practices
- Regularly review this dashboard to manage credit efficiency.
- Identify high-usage projects and adjust their recheck intervals if needed.
- Use the analytics data to plan your monthly credit top-ups.
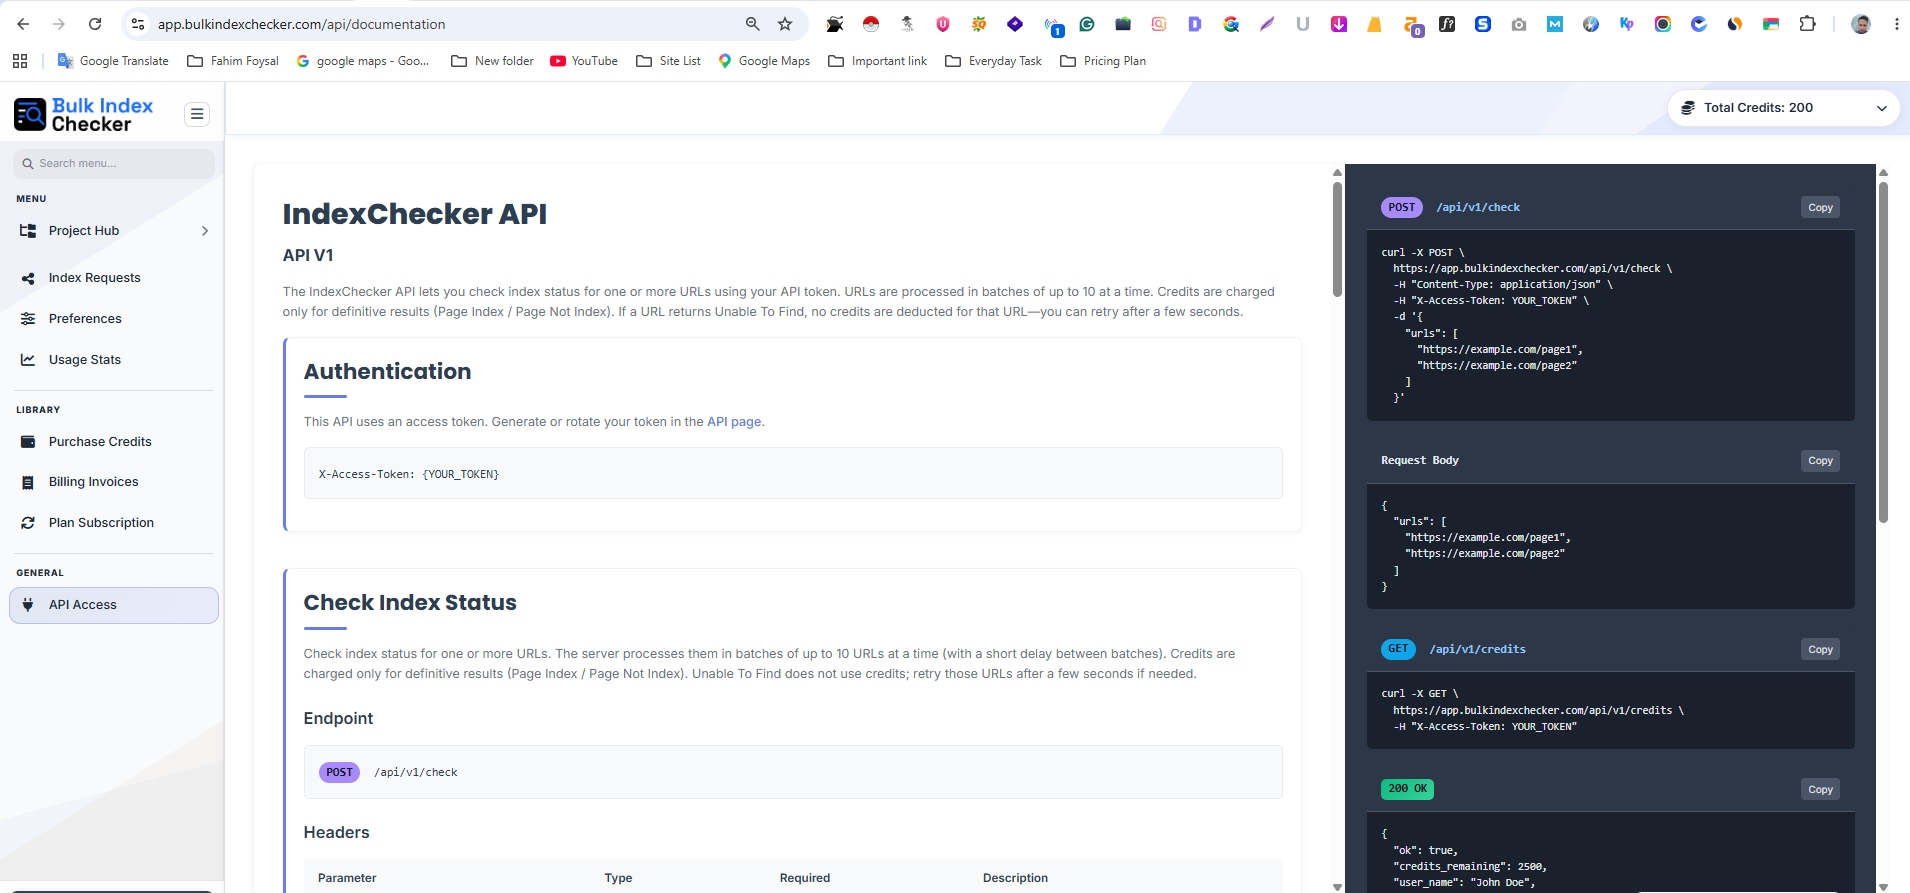
API Documentation
Open the developer documentation and review the API reference image for Bulk Index Checker.
Developer Documentation
API Documentation Screenshot
Use the official API documentation page for the full developer reference and implementation details.